Monday, July 28, 2014

Shrimp scampi


This is one of my favorite recipes, it's simple, with minimal ingredients, and just so fresh tasting!

(I doubled this recipe because I like to take leftovers and to work, and I always get seconds at dinner....)

Round it up;
  • 4 tablespoons butter
  • 2 tablespoons extra virgin olive oil
  • 4 cloves garlic, minced 
  • 1 tablespoon large raw shrimp
  • 1/2 cup white wine (I used this boxed chardonnay, the rooster caught my attention..)
  • 2 whole lemons squeezed
  • salt, pepper, tony's seasoning- just a few dashes of each
  • 1 box of angel hair pasta
  • fresh basil
  • fresh grated parmesan cheese


Mince your garlic and squeeze those lemons,


Heat the olive oil and butter in a skillet until melted, add garlic and cook for a few minutes, this is when your whole house begins to smell wonderful!


Add shrimp and cook until pink and done


Squeeze in the lemon juice, add wine, butter, and seasonings and reduce heat to low.


Add your fresh basil and parmesan, isn't that gorgeous!?


Serve over a bed of angel hair :)


Friday, July 25, 2014

Pallet art

I built a couple of "canvases" out of wood- I had seen these floating around etsy and Pinterest and loved the way they looked! After making some cuts with my miter saw and using wood glue and a nail gun to put these together, I stained them with a dark stain. Next I choose some fun sayings, "love one another" was done with a stencil and "hope anchors the soul" I freehanded as well as the anchor. I cut circles from some scrap fabric and using fabric glue, folded the circle around a piece of twine then stapled the twine to the backside of the board. 

Can't wait to make a few more of these, they are a good use for my fabric hoarding problem...


Thursday, July 10, 2014

New woodworking projects

What started with a pile of wood became this...not bad for one afternoon

Then I stained a few of the pieces, 


Then for colors! It takes me awhile to commit to what color I'm going to paint something- but it's one of my favorite parts.

Some scrap pieces of wood became some mantle or shelf decor :) 


The arrows had some bright colors added and some distressing,


The crate shelf can be a tray on the counter or coffee table or hung on the wall like a shelf, 


And the divider box got paint, numbers, and distressing- perfect size for mail :) 


Still deciding on colors for the two boxes and the large coffee table tray.

-Jamie 


Wednesday, July 2, 2014

Homemade picture ledges


My bedroom was one of the first rooms I decorated after moving into my home, but there was always this large blank wall that I wasn't sure what to do with.  I thought about an additional dresser but I didn't want it to be too crowded.  I also thought about a small console and TV on this wall but I prefer to keep TV's out of the bedroom.  I was looking through Shanty 2 chic's projects and came across these picture ledges,


They were perfect! and super easy to construct.  My original plans were to paint the shelves white but all my furniture is dark and after the first coat of dark stain I really liked the way they were looking and decided to leave them.  I staggered them opposed to stacking to take up more of the wall space.  I love that I can change the items on the shelf such as pictures when I choose and don't have to worry about holes in the wall.  I used dry wall anchors and screwed these directly into the wall. 


One of these days I will invest in a nice camera, but for now it's the trusty ol' iPhone.


I'm not sold on the decor items, I just went around the house and grabbed things, but the Antlers are definitely staying :)

-Jamie


Tuesday, July 1, 2014

New Obsession


This new obsession began one day while browsing Pinterest then stumbling upon Ana White's blog...she has amazing beginner projects and tutorials- I found this Pottery Barn copy cat divider cubbies and thought "I can do that with some help," so I enlisted my boyfriend who is pretty handy with a saw and we put this together in a few hours, 

Original inspiration found here, although we had to modify it a bit,


The shelf then received a coat of dark stain and two coats of Annie Sloan's "Arles" a beautiful mustard color, some sanding to let the stain show through and numbers stenciled with black paint.  I was in LOVE! I had made this and was super proud and hooked...

Here she is hanging in all her glory in my booth where she sold in under a week! :)


While telling my dad about my new found hobby and proudly showing off the picture of the cubby shelf, he said "Theres a miter saw in Grandpa's garage that just sits there, I needed it once for a job, you can have it if you want" YES PLEASE, and then I brought this bad boy home...And yes, I use safety first, always wear your eye protection!


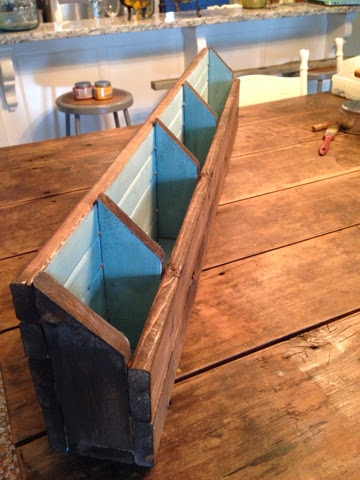
Since I already had the plans and practice, my first project alone was another cubby organizer with a few modifications for larger and fewer cubbies,


I also whipped up a picture frame, stained it dark then painted with Maison Blanche's mason white, then distressed and waxed with Maison Blanch light brown antique wax.


Then this new found hobby took a dangerous turn, I went to Lowe's for some wood and came back with an air compressor, nail gun, shop vac, Kreg jig, and some clamps.


If you have or think about building projects of your own, you MUST get a Kreg Jig! This thing is amazing, 


The next project I tackled was this pegboard as a surprise thank you gift to my boyfriend for his help and teaching along the way.  The Kreg jig came in handy here, where two boards join in each corner, the Kreg jig creates pocket holes behind the boards so that you get a smooth front surface ready for paint or stain.  The credit for the pegboard plans go to Shanty 2 chic, a blog created by two sisters with some serious talent, pretty much my new idols.


I now felt like I could tackle so much more and my brain wouldn't stop turning! everything I saw in a store or on Pinterest, I would think "I can do something like that!" This is the section of my garage that houses my workbench and saw, pegboard (installed by my dad last year and soon to be replaced with a pretty one), sink, and shelving that holds paint and tools.  The workbench leaves no room for assembly so I was constantly on the floor drilling and gluing projects which does a number on your back.  I found plans for a workbench which is fairly simple when you break and down and got to work...


Went to Lowes, and turned this...


Into this :)

Couldn't have done it without these plans from Shanty 2 chic,


Ohhh so much glorious room to spread out!!


A friend asked if we could build her a coffee table, she gave me dimensions and we looked at a few inspiration photos, I am not good at coming up with measurements and plans so my boyfriend, Bob, (insert Bob the builder jokes) made the plans and constructed the coffee table and I had the privileges of putting on its finishing touches.


We had found a picture of a table with different wood tones, so I got out all my colors of stain and a can of white gel paint stain and got to work.  Now it just needs the leg's attached and this will be headed to it's new home.


I think what I love most about woodworking is that I love every aspect of it.  Just about every hobby I get into, there is some aspect that I don't like, such as getting the fabric ironed and cut to sew a project.  With woodworking, I love it all, the assembly and the finishing.  I will be sure to post new projects :)

-Jamie


The goldilocks dining table

I wrote a post awhile back and acquiring my dining room table, I had been searching for the perfect farmhouse table but knew I wanted something genuinely old with some good history and sturdy bones. I found my table on Craigslist and eagerly called the number to find it was still available, upon arriving to pick it up, I may have promised the owner that I would not alter it in any way after I casually mentioned how pretty the legs would be white... I did not sit and the table and had every intention on keeping the table in it's original state...


But then I got it home and sat to eat dinner at it, and i could barely scoot under it, my legs scraped and jammed against the skirt. After living with it for six months and a few people, mainly my 6'2 boyfriend not fitting at it in the least, I decided something needed to be done. I contacted a lady who owns a shop in hazel green and she agreed to take off the old legs and build new chunkier taller legs in their place, I asked to make the table 6 inches taller. The table took a trip in my papas pick up and a few weeks later I picked it up and brought it home. And it was too TALL...


I didn't factor in how long the skirt was when deciding on how much height to add- luckily the legs she built had an odd little extension past the ball of the leg, so we got out the saw and hacked it off and now it's perfect! This will definitely be a table to be passed down.