Wednesday, September 17, 2014

Mural wall's and mail sorter's


After searching month's for a rug, then finding this one, and changing the end tables, my living room was still missing something.  My vision of "homey" is probably everyone else's vision of cluttered, my Grandma says I have entirely too much "stuff" especially on my walls, but the wall above my couch BOTHERED ME, like a lot, and every time I looked at it I saw the lonely window.  

I had been debating between a gallery wall or a few items to each side of the window.  But I love gallery walls and I like lots of stuff so the decision was made.  I started collecting frames and some of my favorite things around the house and gathering them into a pile on my kitchen table- I would walk by and rearrange the laid out arrangement until I was satisfied. 


Then I made paper cut outs of each item and taped it so I knew where it would go on the wall.


I made the wooden shelf with some scrap furring strips and stained it.  The main white frame in the middle is a yard sale find that was  originally gold.  The feather was my favorite find at this year's "World's longest yard sale."

The large white frame's quote states "There are so many beautiful reasons to be happy."

The smaller white frame says "Let nothing dim the light that shines from within."

The small frame on top of the white shelf, "Learning to live in the present moment is part of the path of joy."


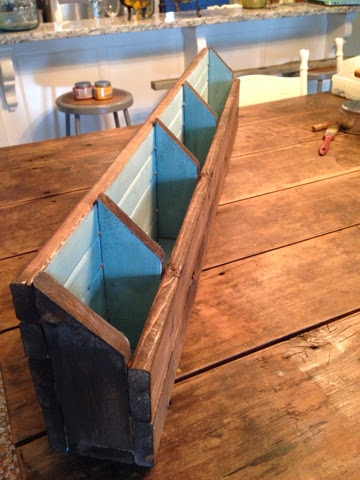
I finished the mural wall Sunday morning and then browed Craigslist as I do at least once a week and saw THIS.....


I fell in LOVE, I HAD to have it, I immediately sent a text to the seller asking if it was still available and giving them my offer, he accepted and told me I could pick it up that night!


The seller stated the piece is an antique mail sorter and from the late 1800's to early 1900's.


Even I admit that the living room is now slightly cluttered, but I love everything in it and can't part with any of my things.  I have thought about moving the mail sorter to the wall by the window and moving the blue chair more centered with the window.  I will live with this arrangement awhile and see how I feel.


When I look at this picture, I feel completely content and a huge sense of "home," I think that's when you know your doing something right.  It's you that is living in your home, no one else, so don't try to copy a magazine or go with some trendy pattern, simply buy things you love and things that have meaning to you.  

-Jamie


Friday, August 22, 2014

Living Room Progression

Home decor...One of my ohhh so favorite things!

However, I can browse through Pinterest for HOURS and pin lots of gorgeous rooms that I'm in love with, but when it comes to my own home, I have such a hard time making up my mind! I love neutrals, and I'm drawn to rooms with lots of whites, such as this gorgeous room... (courtesy of Liz Marie's blog) 


But my personality just requires more color, I have decided I just simply cannot have a room comprised of only whites and creams. 

The first step of my Living room re-do was to find a new rug.  I LOVED my garage sale find rug, but after living with it for a year, it was time for a change, I needed something more neutral, something where I could change the pillows and seasonal decor without having to worry about matching. 


I really like the look of the natural jute rugs, but my adjoining dining room has one and I think two side by side would be too much. I also like big patterns but knew I would grow tired of one, these were contenders...


Loved the colors but the strips would go vertical in the living room which I wasn't a fan of. 


I am still drawn to chevron even though it is everywhere, but knew I would grow tired of this one.


Very neutral but needed to step away from "oriental."

None screamed "take me home!" until I saw this...


I was instantly attracted to it, it was neutral, it would match my natural jute rug in the dining room.  Only problem was it was an 7'6 by 9'6- after living with a 9 by 12 I was afraid it would be too small, and at first it was,


The former rug went well under the couch and allowed both nightstands to sit fully on the rug.


At this point I had decided it wasn't going to work and that it was going back to the store in the morning but my boyfriend convinced me  that I would grow to like it if I waited a bit- the next morning (and with natural light) I realized I did indeed like it, but that the cream end tables had to go.  Luckily I am just short of a hoarder and had plenty of options in my garage to choose from.  I bought in a nightstand and decided it was perfect. 


It's slowly coming together. Still looking for a side table for the right side so I can put my other lamp back and trying to decide what to put above the couch, thinking of another gallery wall but smaller in size than the one in my kitchen. 

But I am happy with the changes so far :)


Monday, July 28, 2014

Shrimp scampi


This is one of my favorite recipes, it's simple, with minimal ingredients, and just so fresh tasting!

(I doubled this recipe because I like to take leftovers and to work, and I always get seconds at dinner....)

Round it up;
  • 4 tablespoons butter
  • 2 tablespoons extra virgin olive oil
  • 4 cloves garlic, minced 
  • 1 tablespoon large raw shrimp
  • 1/2 cup white wine (I used this boxed chardonnay, the rooster caught my attention..)
  • 2 whole lemons squeezed
  • salt, pepper, tony's seasoning- just a few dashes of each
  • 1 box of angel hair pasta
  • fresh basil
  • fresh grated parmesan cheese


Mince your garlic and squeeze those lemons,


Heat the olive oil and butter in a skillet until melted, add garlic and cook for a few minutes, this is when your whole house begins to smell wonderful!


Add shrimp and cook until pink and done


Squeeze in the lemon juice, add wine, butter, and seasonings and reduce heat to low.


Add your fresh basil and parmesan, isn't that gorgeous!?


Serve over a bed of angel hair :)


Friday, July 25, 2014

Pallet art

I built a couple of "canvases" out of wood- I had seen these floating around etsy and Pinterest and loved the way they looked! After making some cuts with my miter saw and using wood glue and a nail gun to put these together, I stained them with a dark stain. Next I choose some fun sayings, "love one another" was done with a stencil and "hope anchors the soul" I freehanded as well as the anchor. I cut circles from some scrap fabric and using fabric glue, folded the circle around a piece of twine then stapled the twine to the backside of the board. 

Can't wait to make a few more of these, they are a good use for my fabric hoarding problem...


Thursday, July 10, 2014

New woodworking projects

What started with a pile of wood became this...not bad for one afternoon

Then I stained a few of the pieces, 


Then for colors! It takes me awhile to commit to what color I'm going to paint something- but it's one of my favorite parts.

Some scrap pieces of wood became some mantle or shelf decor :) 


The arrows had some bright colors added and some distressing,


The crate shelf can be a tray on the counter or coffee table or hung on the wall like a shelf, 


And the divider box got paint, numbers, and distressing- perfect size for mail :) 


Still deciding on colors for the two boxes and the large coffee table tray.

-Jamie 


Wednesday, July 2, 2014

Homemade picture ledges


My bedroom was one of the first rooms I decorated after moving into my home, but there was always this large blank wall that I wasn't sure what to do with.  I thought about an additional dresser but I didn't want it to be too crowded.  I also thought about a small console and TV on this wall but I prefer to keep TV's out of the bedroom.  I was looking through Shanty 2 chic's projects and came across these picture ledges,


They were perfect! and super easy to construct.  My original plans were to paint the shelves white but all my furniture is dark and after the first coat of dark stain I really liked the way they were looking and decided to leave them.  I staggered them opposed to stacking to take up more of the wall space.  I love that I can change the items on the shelf such as pictures when I choose and don't have to worry about holes in the wall.  I used dry wall anchors and screwed these directly into the wall. 


One of these days I will invest in a nice camera, but for now it's the trusty ol' iPhone.


I'm not sold on the decor items, I just went around the house and grabbed things, but the Antlers are definitely staying :)

-Jamie


Tuesday, July 1, 2014

New Obsession


This new obsession began one day while browsing Pinterest then stumbling upon Ana White's blog...she has amazing beginner projects and tutorials- I found this Pottery Barn copy cat divider cubbies and thought "I can do that with some help," so I enlisted my boyfriend who is pretty handy with a saw and we put this together in a few hours, 

Original inspiration found here, although we had to modify it a bit,


The shelf then received a coat of dark stain and two coats of Annie Sloan's "Arles" a beautiful mustard color, some sanding to let the stain show through and numbers stenciled with black paint.  I was in LOVE! I had made this and was super proud and hooked...

Here she is hanging in all her glory in my booth where she sold in under a week! :)


While telling my dad about my new found hobby and proudly showing off the picture of the cubby shelf, he said "Theres a miter saw in Grandpa's garage that just sits there, I needed it once for a job, you can have it if you want" YES PLEASE, and then I brought this bad boy home...And yes, I use safety first, always wear your eye protection!


Since I already had the plans and practice, my first project alone was another cubby organizer with a few modifications for larger and fewer cubbies,


I also whipped up a picture frame, stained it dark then painted with Maison Blanche's mason white, then distressed and waxed with Maison Blanch light brown antique wax.


Then this new found hobby took a dangerous turn, I went to Lowe's for some wood and came back with an air compressor, nail gun, shop vac, Kreg jig, and some clamps.


If you have or think about building projects of your own, you MUST get a Kreg Jig! This thing is amazing, 


The next project I tackled was this pegboard as a surprise thank you gift to my boyfriend for his help and teaching along the way.  The Kreg jig came in handy here, where two boards join in each corner, the Kreg jig creates pocket holes behind the boards so that you get a smooth front surface ready for paint or stain.  The credit for the pegboard plans go to Shanty 2 chic, a blog created by two sisters with some serious talent, pretty much my new idols.


I now felt like I could tackle so much more and my brain wouldn't stop turning! everything I saw in a store or on Pinterest, I would think "I can do something like that!" This is the section of my garage that houses my workbench and saw, pegboard (installed by my dad last year and soon to be replaced with a pretty one), sink, and shelving that holds paint and tools.  The workbench leaves no room for assembly so I was constantly on the floor drilling and gluing projects which does a number on your back.  I found plans for a workbench which is fairly simple when you break and down and got to work...


Went to Lowes, and turned this...


Into this :)

Couldn't have done it without these plans from Shanty 2 chic,


Ohhh so much glorious room to spread out!!


A friend asked if we could build her a coffee table, she gave me dimensions and we looked at a few inspiration photos, I am not good at coming up with measurements and plans so my boyfriend, Bob, (insert Bob the builder jokes) made the plans and constructed the coffee table and I had the privileges of putting on its finishing touches.


We had found a picture of a table with different wood tones, so I got out all my colors of stain and a can of white gel paint stain and got to work.  Now it just needs the leg's attached and this will be headed to it's new home.


I think what I love most about woodworking is that I love every aspect of it.  Just about every hobby I get into, there is some aspect that I don't like, such as getting the fabric ironed and cut to sew a project.  With woodworking, I love it all, the assembly and the finishing.  I will be sure to post new projects :)

-Jamie